UITouch简单使用

有些时候为了项目的需求需要(在一张广告的图片中,点击不同的区域,需要响应不同的操作)那么我们可以创建一个UIImageView,然后通过UIResponder的相关方法,获取当前的点击区域,通过判断分别处理事件。具体代码如下:

由于UIView继承UIResponder类,可以通过实现如下方法,来获取点击区域操作。

-(void)touchesBegan:(NSSet )touches withEvent:(nullable UIEvent )event

1
2
3
4
5
6
7
8
9
10
11
12
13
14
15
16
17
18
19
20
21
22
23
24
25
26
27
28
29
30
31
32
33
34
35
36
37
38
- (void)touchesBegan:(NSSet<UITouch *> *)touches withEvent:(nullable UIEvent *)event
{
[touches enumerateObjectsUsingBlock:^(UITouch * _Nonnull obj, BOOL * _Nonnull stop) {
if (obj.view == self) {
CGPoint touchPoint = [obj locationInView:self];
NSInteger index = [self locationJugement:touchPoint];
#ifdef DEBUG
NSLog(@"touchPoint....:%@",NSStringFromCGPoint(touchPoint));
#endif
if (self.delegate && [self.delegate respondsToSelector:@selector(tapEventOption:)]&& index >= 0) {
[self.delegate tapEventOption:[self.hotSpotAdsArray safeObjectAtIndex:index]];
}
*stop = YES;
}
}];
}

- (NSInteger)locationJugement:(CGPoint)point
{
__block NSInteger returnIndex = -1;//默认为-1
[self.hotSpotAdsArray enumerateObjectsUsingBlock:^(BBHotspotModel * _Nonnull obj, NSUInteger idx, BOOL * _Nonnull stop) {
#ifdef DEBUG
NSLog(@"obj.rect...:%@",obj.rect);
#endif
if ([obj.rect count] >= 4) {//防止越界
CGFloat orgX = [[obj.rect objectAtIndex:0] floatValue];
CGFloat orgY = [[obj.rect objectAtIndex:1] floatValue];
CGFloat width = [[obj.rect objectAtIndex:2] floatValue];
CGFloat height = [[obj.rect objectAtIndex:3] floatValue];
if ( (point.x > orgX && point.x < orgX + width) && (point.y > orgY && point.y < orgY + height)) {
returnIndex = idx;
*stop = YES;
}
}
}];
return returnIndex;
}
@end

可以通过以下方法测试:

1
2
3
4
5
6
7
8
9
10
11
12
13
14
15
16
17
18
19
- (void)createTestModelArray
{
NSMutableArray *tempArray = [NSMutableArray arrayWithCapacity:4];
for (NSInteger j = 0; j < 4; j++) {
NSArray *array = [[NSArray alloc] init];
BBHotspotModel *mode = [[BBHotspotModel alloc] init];
for (NSInteger i = 0; i < 4; i++) {
NSInteger hang = ((j%2 == 0) ? j/2:(j/2));
NSInteger lei = ((j%2 == 0) ? 0:1);
CGFloat orgX = lei * (SCREEN_WIDTH/2.0);
CGFloat orgY = hang * (200/2.0);
array = [NSArray arrayWithObjects:@(orgX),@(orgY),@(SCREEN_WIDTH/2.0),@(200/2.0),nil];
}
mode.rect = array;
mode.target = [NSString stringWithFormat:@"跳转%ld",j];
[tempArray addObject:mode];
}
self.hotspotArray = [NSMutableArray arrayWithObjects:tempArray,nil];
}

经过测试发现,根据给定每一个特定区域,点击操作实现相关委托即可。

Git常用命令

Git

Git是什么?

Git是目前世界上最先进的分布式版本控制系统
由于使用的mac系统,mac默认安装了Git。可以通过下面命令,在terminate确认是否安装了:

1
git

如果出现了The program ‘git’ is currently not installed. You can install it by typing:提示则表示没有安装,使用:

1
sudo apt-get install git

输入密码即可以等待安装成功。

Git常用命令
1
2
3
4
5
6
7
8
9
10
11
12
13
14
15
16
17
18
19
20
21
22
23
24
25
26
27
28
29
30
31
32
33
34
35
36
37
38
39
40
41
42
43
44
45
46
47
48
49
1. git clone <https,ssh项目的地址>  (表示clone所有的分支)
example: git clone http://git.husor.com.cn/ios/beibei.git

2. git clone -b <分支名称> <https,ssh项目的地址> (表示clone某一个分支)
example: git clone -b release/v4.0.0 http://git.husor.com.cn/ios/beibei.git

3. git branch -r (查看当前项目所有的分支)
example: git branch -r
origin/HEAD -> origin/master
origin/beibei_pod
origin/develop_merge_to_pods
origin/feature/brand_martshow_4.0
origin/feature/develop_4.0.1
origin/feature/lyd_chaozhi
origin/release/v4.0.0
......
4. git checkout <分支名称> (表示检出新的远程分支到本地)
example: git checkout feature/martshow_peel
Branch feature/martshow_peel set up to track remote branch feature/martshow_peel from origin.
Switched to a new branch 'feature/martshow_peel'
5. git commit -a (提交本地的修改文件到暂存区,这个时候会默认调用vim编辑器,输入提交信息);也可以使用git commit -a -m "commit info"
example1: git commit -a

example2: git commit -a -m ".gitignore文件"

如果出现:(表示没有跟踪到的问题)
Untracked files:
BeiBeiAPP.xcodeproj/xcshareddata/
这种类型行的问题,则需要使用git add BeiBeiAPP.xcodeproj/xcshareddata/命令后重新提交即可
6. git push <远程分支> (表示将本地修改的暂存区的内容提交到对应的远程分支)
example: git push feature/martshow_peel
7. git merge <远程分支> (表示从远程分支拉取代码合并到本地)
example: git merge release/v4.0.0 (以下的合并存在冲突)
Auto-merging BeiBeiAPP/BeiBei-Info.plist
CONFLICT (content): Merge conflict in BeiBeiAPP/BeiBei-Info.plist
CONFLICT (modify/delete): BeiBeiAPP/BBClasses/C2C(圈儿)/Common(基础)/BBNavigator+C2CNavigator.m deleted in HEAD and modified in release/v4.0.0. Version release/v4.0.0 of BeiBeiAPP/BBClasses/ C2C(圈儿)/Common(基础)/BBNavigator+C2CNavigator.m left in tree.
Auto-merging BeiBeiAPP.xcodeproj/project.pbxproj
Automatic merge failed; fix conflicts and then commit the result.

8. git tag -l
example: iMac-tortoise:BBCore tianww$ git tag -l
9. git branch [name] (基于当前分支创建本地分之,name分之名称)
example: git branch feature/tianww
10. git push origin [localBranchName]:[branchName](提交本地分支到远程分支)
example: git push origin feature/tianww:feature/tianww

11. git rm -r [filesName] //删除filesName文件所有的文件包含文件夹
example: git rm -r View//删除View文件夹下所有的内容
12.

高级篇

1
2
3
4
5
1. git status (查看当前所有文件的状态)
2. git log(查看提交的log)
3. git reset --hard (reset本地的所有文件,不保留修改untrack的文件)
4. git checkout .(本地所有没有提交的,都返回到原来状态)
5. git diff(查看详细的修改文件代码)
Git常用的工具

SourceTree(推荐,appstore上面即可下载,简单实用功能强大)

Tower (强大,但是要钱)

GitBash

EGit

参考

1.Git命令总结(本地仓库篇)

2.Git常用操作命令

Git版本控制.gitignore文件

Git忽略规则。

.gitignore文件。

.gitignore 配置文件用于配置不需要加入版本管理的文件,配置好该文件可以为我们的版本管理带来很大的便利.版本库中目录下的.gitignore文件作用于整个目录及子目录,会随着该版本库同其他人共享。文件存放在当前Respositories工作目录下,当然默认是不可见的,可以调用如下命令:

1
2
defaults write com.apple.finder AppleShowAllFiles YES //显示隐藏文件
defaults write com.apple.finder AppleShowAllFiles NO//隐藏不可见文件

然后输入以下命令:

1
2
iMac-7:beibei tianww$ cd /Users/tianww/Documents/ipa_Project/beibei 
iMac-7:beibei tianww$ vim .gitignore

我们会看到以下内容:

1
2
3
4
5
6
7
8
9
10
11
12
13
14
15
16
17
18
19
20
21
22
23
24
25
26
27
28
29
30
31
*~
.DS_Store
.idea/

# Xcode
#
build/
buildipa/
*.pbxuser
!default.pbxuser
*.mode1v3
!default.mode1v3
*.mode2v3
!default.mode2v3
*.perspectivev3
!default.perspectivev3
xcuserdata
*.xccheckout
*.moved-aside
DerivedData
*.hmap
*.ipa
*.xcuserstate
xcshareddata/

Pods/
Podfile.lock

*.xcuserdatad
".gitignore" 8501L, 482577C
......

需要注意的是,有些东西是xcode默认会在.gitignore中忽略掉的:比喻在修改了schemes的时候,无论你怎么修改,都看不到在在git里面有修改记录的,其实这个是默认会忽略掉的。这个时候,我们为了统一控制一些东西,就需要修改.gitignore中的内容了,需要将(*.xcuserstate xcshareddata/)两个删除掉,修改成功后提交git,那么所有人的配置就一致了,这个时候我们重新添加刚刚删除的内容,无论别人怎么修改也不会修改默认的统一的配置了。

exclude文件。

本地的针对具体版本库的独享式忽略文件

即在版本库.git目录下的文件info/exclude中设置文件忽略

1
2
3
4
iMac-7:~ tianww$ cd /Users/tianww/Documents/ipa_Project/beibei/.git/info/
iMac-7:info tianww$ ls
exclude refs
iMac-7:info tianww$ vim exclude
core.excludesfile文件。

本地的全局的独享式忽略文件,通过Git的配置变量core.excludesfile指定的一个忽略文件(指定文件名),其设置的忽略对所有本地版本库均有效。设置方法如下(文件名可以任意设置):

1
git config --global core.excludesfile ~/.gitignore

Git忽略文件语法。

  1. 忽略文件中的空行或以井号(#)开始的行将会被忽略。
  2. 可以使用Linux通配符。例如:星号(*)代表任意多个字符,问号(?)代表一个字符,方括号([abc])代表可选字符范围,大括号({string1,string2,…})代表可选的字符串等。
  3. 如果名称的最前面有一个感叹号(!),表示例外规则,将不被忽略。
  4. 如果名称的最前面是一个路径分隔符(/),表示要忽略的文件在此目录下,而子目录中的文件不忽略。
  5. 如果名称的最后面是一个路径分隔符(/),表示要忽略的是此目录下该名称的子目录,而非文件(默认文件或目录都忽略)。

example:

1
2
3
4
5
6
# 这是注释行,将被忽略
*.a # 忽略所有以.a为扩展名的文件
!lib.a # 但是名为lib.a的文件或目录不要忽略,即使前面设置了对*.a的忽略
/TODO # 只忽略此目录下的TODO文件,子目录中的TODO文件不忽略
build/ # 忽略所有build目录下的文件,但如果是名为build的文件则不忽略
doc/*.txt # 忽略文件如doc/notes.txt,但是文件如doc/server/arch.txt不忽略

iOS使用Jenkins进行持续集成

持续集成是个简单重复劳动,人来操作费时费力,使用自动化构建工具完成是最好不过的了,为了达到这个需求我选择了jenkins

Jenkins是基于Java开发的一种持续集成工具,用于监控持续重复的工作,功能包括:

1、持续的软件版本发布/测试项目。

2、监控外部调用执行的工作。

3、类目丰富的插件8000多种支持

4、支持RSS/Email通知机制

搭建Mac系统的jenkins CI(Continuous integration)

1、进入brew官网,通过使用Homebrew命令安装jenkins,安装brew的方式按照提示在terminate中输入以下命令。或者直接从Jenkins下载,推荐使用第一种方式,以下为第一种方式。

1
/usr/bin/ruby -e "$(curl -fsSL https://raw.githubusercontent.com/Homebrew/install/master/install)"

2、安装jenkins,在terminate中输入以下命令,安装jenkins。

1
brew install jenkins

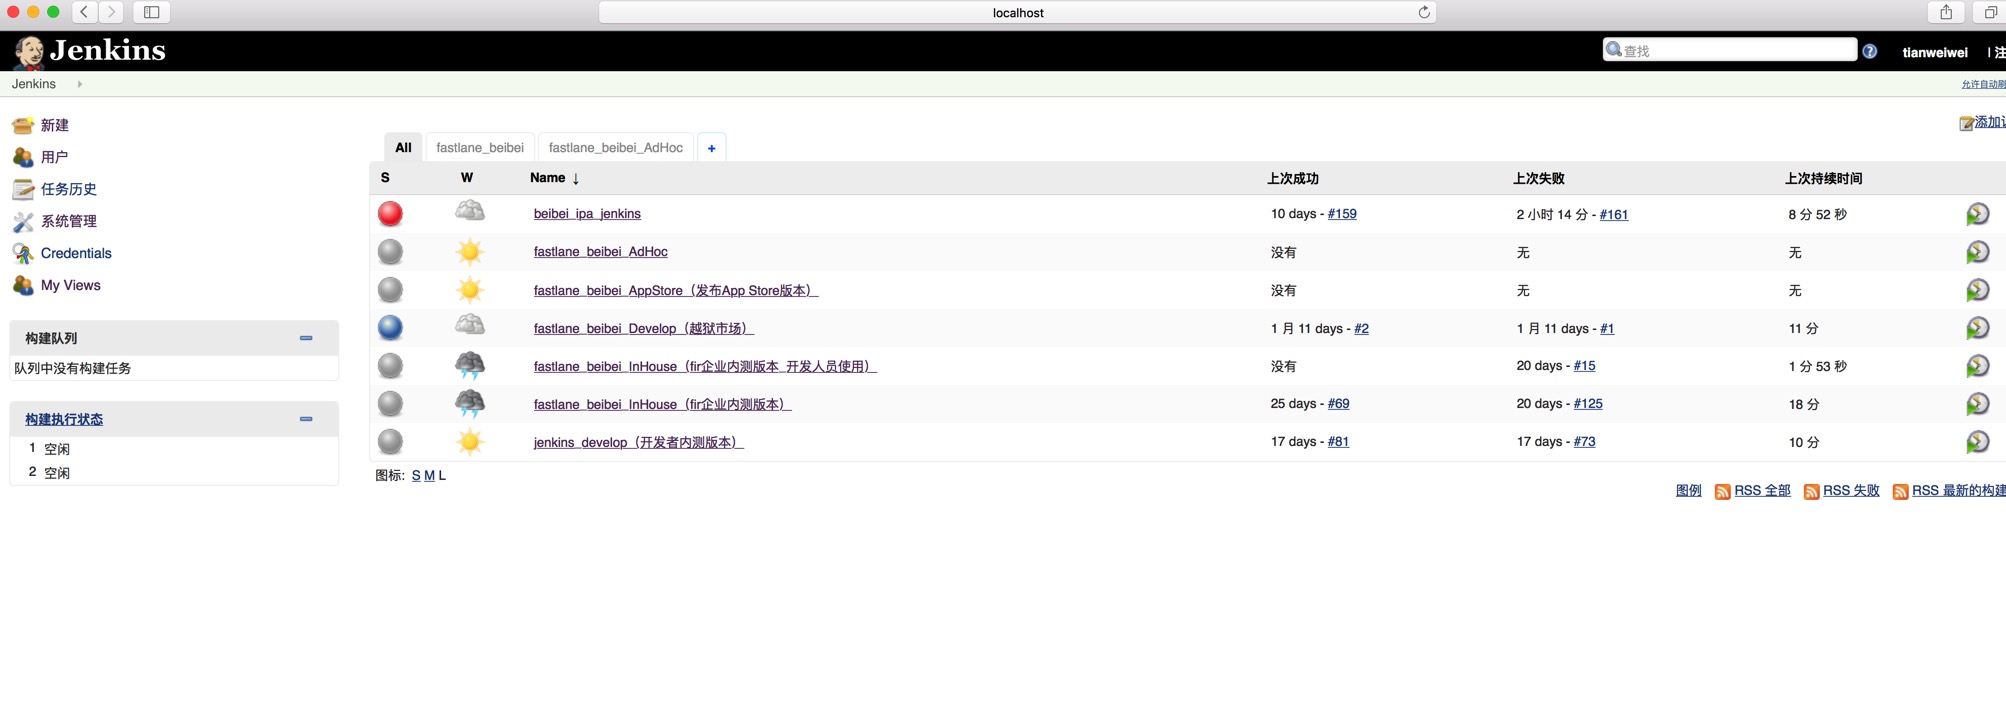
3、步骤1,2成功后,在terminate中输入jenkins启动Jenkins后,打开http://localhost:8080,即可进入jenkins主页面,如下图:

Markdown preferences pane

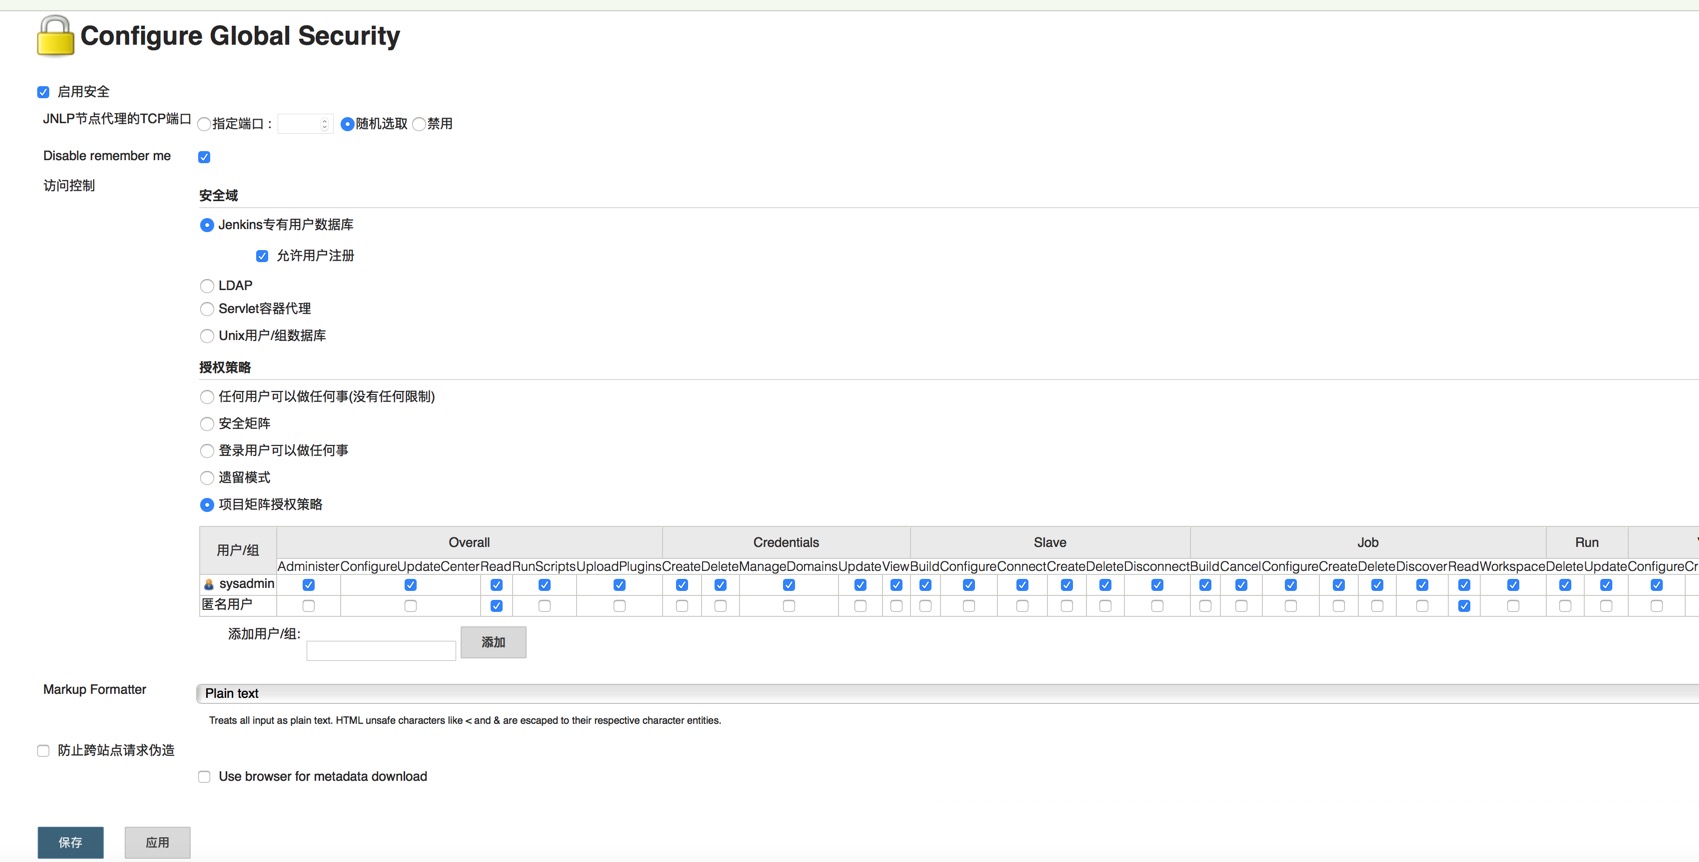
4、设置jenkins安全权限设置,点击左侧的系统管理,选择Configure Global Security,参考安全设置,如下图:

Markdown preferences pane

5、安装必要的插件,选择系统管理->管理插件->可选插件(选择必要的插件即可,CocaoPods Jenkins Integration,fir-plugin,Github plugin,Publish Over FTP,Xcode integration等可根据实际情况选择。如果仅仅测试jenkins打包ipa可直接选择最后一个插件即可)。当前我选择的所有插件满足以下需求,每隔15分钟(如果有开发人员提交代码),会自动从github上面拉取代码,更新pod库,jenkins打包成功后自动上传到fir或者FTP服务器。

6、以上基本环境搭建成功后,即可选择新建一个项目item->item名称->构建一个自由风格的软件项目(一些必要的信息填写)

7、下一篇会重点介绍Jenkins+Github+Xcode+Fir CI实战

Hexo+Github搭建个人博客

总想着搭建自己的个人博客,找了好久。再一次面试过程中,有看到面试者的个人简历介绍中有谈到Hexo+Github的方式搭建自己个人博客,如是就有了下面的内容了。之前有使用过其它的一些第三方的博客,总之是各种广告内容,看着不舒服;当然也有使用有道笔记,总是感觉缺少点什么。一方面为了,提升自己的写作能力,同时也是对日常工作的整理。好吧,正文从下面开始吧。

配置环境

安装Node(必须)

作用:用来生成静态页面的到Node.js官网下载相应平台的最新版本,一路安装即可。
安装Git(必须)作用:把本地的hexo内容提交到github上去.安装Xcode就自带有Git,我就不多说了。
申请GitHub(必须)作用:是用来做博客的远程创库、域名、服务器之类的,怎么与本地hexo建立连接等下讲。github账号我也不再啰嗦了,没有的话直接申请就行了,跟一般的注册账号差不多,SSH Keys,看你自己了,可以不配制,不配置的话以后每次对自己的博客有改动提交的时候就要手动输入账号密码,配置了就不需要了,怎么配置我就不多说了,网上有很多教程。

正式安装Hexo

Node和Git都安装好后,可执行如下命令安装hexo:
npm install -g (安装hexo的命令)
hexo初始化然后,执行init命令初始化hexo到你指定的目录,
我是直接cd到目标目录执行hexo init的。命令:
hexo init(init hexo的目录)

1
2
npm install -g hexo
hexo init
启动本地服务

启动本地服务,进行文章预览调试,命令:
hexo server
浏览器输入http://localhost:4000 配置正常的话,会进入本地服务的页面
我不知道你们能不能,反正我不能,因为我还有环境没配置好
我的hexo版本信息如下:

1
2
3
4
5
6
7
8
9
10
11
12
iMac-7:beibei tianww$ hexo version
hexo-cli: 1.0.1
os: Darwin 15.3.0 darwin x64
http_parser: 2.6.2
node: 5.7.0
v8: 4.6.85.31
uv: 1.8.0
zlib: 1.2.8
ares: 1.10.1-DEV
icu: 56.1
modules: 47
openssl: 1.0.2f

配置Github

首先需要在Github上面注册帐号后,建立Repository项目,仓库的名称必须为【your_user_name.github.io】固定写法,然后建立关联。本地的blog地址为/Users/tianww/Desktop/hexo,ls目录下面的内容:
_config.yml node_modules public source
db.json package.json scaffolds themes
现在我们需要_config.yml文件,来建立关联,命令:
vim _config.yml到最下面加入:

1
2
3
4
deploy:
type: git
repository: https://github.com/Tweiwei497435786/Tweiwei497435786.github.io.git
branch: master

把上面对应的改成你的帐户就可以了。网上会有很多说法,有的type是github, 还有repository 最后面的后缀也不一样是github.com.git,我也踩了很多坑,我现在的版本见上面,执行命令hexo -vsersion就出来了,貌似3.0后全部改成我上面这种格式了
然后执行配置部署命令:
hexo deploy
在浏览器中输入http://Tweiwei497435786.github.io/就行了,改成你自己的。

部署的步骤

每次部署的步骤,可以按照三步进行。

1
2
3
hexo clean
hexo g
hexo deploy

遇到的问题

1.如发生 ERROR Deployer not found: git 或者 ERROR Deployer not found: github
解决方法: npm install hexo-deployer-git –save

2.由于yml语法比较严格,注意配置的时候冒号:之前都是有空格的

3.在本地生成的目录中的public文件夹和你远程的github的项目中是对应,不能通过git方式直接操作远程的。由于每次本地会deploy操作。所以需要添加文件的操作,可以直接在本地文件目录public下面直接添加,然后重新部署,这样远端和本地就一样了。

拓展

hexo常用的命令

hexo new”postName” #新建文章
hexo new page”pageName” #新建页面
hexo generate #生成静态页面至public目录
hexo server #开启预览访问端口(默认端口4000,’ctrl + c’关闭server)
hexo deploy #将.deploy目录部署到GitHub
hexo help #查看帮助
hexo version #查看Hexo的版本

博客主题theme

这里有大量的主题,选择一款自己喜欢的主题

Yilia- Responsive and simple style 优雅简洁响应式主题,我用得就是这个
注意直接下载该主题,然后拷贝yilia文件目录到本地目录的themes下面,修改_config.yml文件的theme: yilia就可以了,开始你的博客吧!